How to Take Stunning Photos Using AI
- CoffeeAndComix
- Feb 28
- 2 min read
I’ve always had an appreciation for photography, but let’s be real—AI is basically Photoshop with fewer steps and way less effort. Back in the day, I actually wanted to be a model. But that dream quickly turned into an unhealthy obsession with body image, leading to some not-so-great eating habits, so I threw that dream straight into the garbage where it belonged.
That being said, I still have model good looks—I’m just not putting any energy into it. I know I’m cute. I don’t need Vogue to tell me that. 💁🏾♀️
Now, let’s get into how you can take stunning AI-generated photos using a few simple apps!
Apps You’ll Need:
💡 Bonus: If you use my referral link, you’ll get 20 free credits on Selfzy.ai!
Step 1: Create Your Base Image
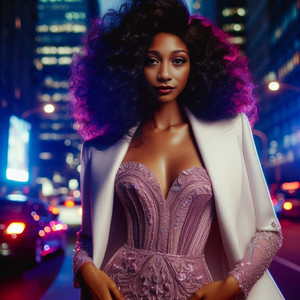
For this step, I like using Bing AI to generate an image as a foundation.
🔹 Be as detailed as possible in your prompt! Describe exactly what you want—pose, lighting, outfit, background, facial expression—everything.
Example Prompt:"A confident woman posing in an elegant, high-fashion outfit, standing in front of a neon-lit cityscape at night. She has deep brown skin, voluminous curls, and a fierce expression. The lighting is cinematic, with moody shadows and vibrant colors."

Once you generate your base image, save it and move to the next step.
Step 2: Enhance the Image in Selfzy.ai
Now that you have your AI-generated photo, it’s time to polish it up and make it look more natural.
Create a Face Profile in Selfzy.ai
You can literally use Remini to sharpen some old selfies and upload them as your reference images.
The better your face profile, the more accurate the AI results will be.
Go to AI Lab - AI Retake
Upload your AI-generated image and hit continue.
The AI will refine the face and generate variations, giving you different eye positions, angles, and subtle tweaks.


Step 3: Add Finishing Touches
At this point, you can either leave the image as is or do some final edits. Add filters, adjust colors, tweak the lighting—whatever makes it feel more “you.”
The best part? You don’t have to spend hours posing, styling, and taking 100 photos just to get one good shot. AI does all the heavy lifting, and you still end up with a stunning, professional-looking image.

Final Thoughts: Have Fun With It!
AI photography isn’t about replacing real photos—it’s about exploring creativity, having fun, and making stunning images effortlessly. Whether you’re generating portraits for social media, fun edits, or just experimenting with AI, the possibilities are endless.
So go ahead, play around, mix things up, and create something amazing!

Comments